Monday, May 29, 2006

PRUNING LILACS

I hope you read my previous post on pruning. It hits all the very basic ideas. However, now your lilacs are about done blooming, and it's time to think about dealing with them specifically. Mine are in full bloom right now. I took this photo just a couple of days ago.
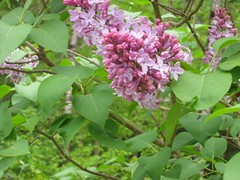
However, when you are done enjoying them, IT WILL BE TIME TO DEAL WITH THEM!
Lilacs bloom on last year’s growth. What this means is that you can prune them right now and all of this years growth should begin to give you bloom either next year or the year following. Buds form in June and July, so you’ve got time to get the job done now.
The object is to have 7 to 10 stems of different ages (or thicknesses). The easiest way to deal with them is to remember that you want the blooms down where you can smell, as well as reach them. So, every year, trim out about a fifth of the branches growing up from the ground. Take out the thickest and the oldest branches first, cutting them as close to the ground as is practical. The reason you do that is because the oldest branches either don’t bloom as well, or they are blooming up SO high that you can neither take cuttings for the table (or to give to friends), or enjoy the wonderful odor they produce! I know it absolutely KILLS you to cut out those lovely tall branches, but believe me you’ll be happier for having done it. The plant will look much better since it won’t be as straggly any longer. It will also bloom much better next year!
If you do this every year after blooming, in about 4-5 years you’ll have a totally rejuvenated bush! ENJOY!

By the way, here’s a book I think should answer all your questions.

Wednesday, May 24, 2006

DYING TREES BY ROADSIDES

We’ve all seen them. As we drive along the road we see dead or dying trees. It always brings the comment, or question: “I wonder what causes that?” As gardeners, it would be good to know!
Here’s a very probable solution that was put forth by G.W. Hudler from Cornell University. I saw this little article in the New Hampshire Community Forestry Advisory Council newsletter back in the spring of 2004.
He talks about the fact that although there may be many possible contributing factors to this die-off, most likely it is caused by salt.
The corrosive effects salt has on automobiles also play havoc on plant materials, like trees. We all know that up here in our snow ridden climate, roads are “sprinkled” with chemicals, most often salt and that when it washes off the road, it goes right to the roots of those plants. Also, when the cars and trucks go flying by, they spray that same chemical concoction onto the leaves of the trees and plants growing close by the road.
“One of the primary causes of salt injury to plants is high salt accumulation in the soil near a plant’s root system. If you have ever tried to shake salt from a wet shaker, you know it’s virtually impossible-because salt absorbs water. Salt has the same properties in soil and can actually absorb much of the water that would normally be available to plants. As a result, even when soil moisture levels are high, salt can cause drought-like conditions for plants.
“Salt can also be directly absorbed by plant cells when plants are sprayed from passing vehicles. When this happens, cold hardiness may be reduced leaving plants more susceptible to freezing.
“In addition to the direct effects of salt, salt injured plants are weaker and more susceptible to insects, diseases, and environmental factors contributing to their decline or death.”

Saturday, May 20, 2006

RAIN

We've had about enough rain, don't you think?
It's been such an ongoing deluge that the garden must be about ready for some sun and games!
There's still some wonderful compost sitting there, at the bin, ready to be distributed around to various plants in the garden. I always put a few shovelfuls around my shrubs and perennials just to give them a boost in the spring. The ones that got their little fix before the rains are probably very happy right now. The other's look on with envy! Oh, well. A few more days, and perhaps I can get back out there.
My only issue now will be that the black-flies and mosquitoes will probably be RAVENOUS!

Monday, May 15, 2006

PRUNING BASICS

Yesterday, as I sat listening to the sermon in church, the minister talked about "pruning the vine". He was of course, not talking about pruning "literally" but rather in the biblical sense. Being me, my mind began naturally to wander to pruning in MY garden. The minister talked about how he (as a person) had NO interest really in gardening and if he did, he wouldn't have the slightest clue about how to PRUNE! I'll bet a lot of you, my readers, suffer from similar apprehensions. So, let's deal with your "real" garden, with it's "real" needs where PRUNING is concerned. If you want to check out a file that tells you all you'll ever need to know about pruning click the above link. If you want something simpler, read on!

For instance, why even prune?

  • To make your garden, shrubs and trees look the way YOU want them to look!
  • To keep that plant healthy
  • To control rampant or unattractive growth
  • To improve the quality of flowers and fruit

There are some VERY basic things you need to remember before you even think about picking up those pruning shears, loppers or pruning saw.

  • Are those tools CLEAN? It doesn't hurt to dip the cutting surfaces in some alcohol or common household bleach to get rid of any "nasties" lurking there.
  • What plants are you thinking about pruning? If it is a spring blooming shrub like a lilac, rhodendron, azalea, etc. WAIT until it's done blooming! Why cut off those pretty flowers??? You can certainly cut them for bringing into the house and enjoying them, but don't prune until the shrub is done pleasing your eyes and nose.
  • If it blooms at the END of the season, like late summer or autumn, it's OK to prune as early in the spring as possible. The reason for this is that early blooming shrubs bloom on last years growth, and you don't want to remove that growth before it has an opportunity to bloom. Late bloomers usually bloom on THIS years growth. So by pruning (very) early you'll encourage new growth and lots of bloom!
  • OK, you're now ready to cut, right?
  • Look at the shrub or small tree and remove any DEAD, DISEASED, or DYING branches.
  • THEN, remove any branches that are growing into the center of the bush. The reason you remove them is that they stop the breezes from getting into the center. If the bush is crammed with leaves in the center, it is vulnerable to fungus and mold, disease and bugs. However, cutting all that stuff out, allows the plant to get some good ventilation!
  • Now, cut off any branches that are growing straight UP. They are usually "water shoots" and are unfruitful. (Don't even ask why. Some things are just "understood"! Or to put it another way, I haven't got a CLUE!)
  • You're almost done... but now look for branches that are rubbing against other branches. That rubbing will eventually cause an abrasion which eventually gets raw and could be very vulnerable to disease. Decide which branch looks best and cut out the other one.
  • BY THE WAY-when you cut, cut where the branch joins the next largest branch, back toward the shrub/tree. DON'T make stumps! Cut close to the main branch. Make it LOOK good!
  • When you're done with all this, stand back and see how the shrub looks. This is the time when you can attempt to make it look the way YOU want it to look; the way it is most attractive in your garden and it's surroundings. Then just cut out the branches you don't want. Again, don't leave stumps and CERTAINLY DON'T TEAR ANYTHING. The cut should be as clean, and sharp, as possible.

This doesn't cover EVERYTHING, but it's enough to get you started. If you have a questions, make a comment below and I'll attempt to answer it, or find out where you can get the information.

Remember that link I had above? Here it is again so you can get more information if you need it!

By the way, remember the disinterested minister? I did give him a few basic clues about pruning after church. He laughed and said he'd give me a call if he needed something done in his little parsonage garden! I guess I haven't converted him to gardening. :-)

Thursday, May 11, 2006

WANT TO HELP? LEAVE FAWNS ALONE

I received this letter from the NH Fish and Game Department via the Internet yesterday. As is sometimes the case, I feel to repeat the entire article is the best way to distribute this information. This letter addresses young animals and the fact that we need to resist the urge to help by taking them home and caring for them. Almost invariably there is a mother watching with fear in her heart. So, "Leave those babies ALONE"!

CONCORD, N.H. -- With springtime wildlife young now on the scene, the New Hampshire Fish and Game Department has issued a reminder that you should NOT pick up any animals you may find, especially fawns (newborn deer) or moose calves.

"Remember -- the best chance a young wild animal or bird has to survive is with its parents," says Fish and Game Wildlife Programs Administrator Mark Ellingwood. "Give fawns, moose calves and other young animals plenty of space and leave them alone and in the woods, where they belong."

Late May through June is the time of year when people are apt to see deer fawns by themselves. Seeing a fawn alone does NOT mean that it is orphaned or that it needs human help. It is normal for a doe to leave her fawn alone while she goes off to feed, typically in the early morning and evening hours. In many cases, the doe will not return until nightfall.

Ellingwood notes that fawns are not defenseless creatures. Their cryptic coloration, tendency to stay perfectly still and lack of scent are all adaptations that help boost survival. The absence of a doe at the bedding site of fawns enhances fawn survival as well. Does are easy to detect because of their size and scent; predators would quickly key in on does in order to find fawns, if the two associated with one another constantly. "Well intentioned but misguided people who apply human behaviors and attributes to wild animals often literally love our wildlife to death," said Ellingwood.

If you're lucky enough to see a fawn, count your blessings and leave the area, he advises. Your continued presence or frequent visits will only contribute to the likelihood of the fawn being abandoned or found by a predator. Unless you can verify that a fawn's mother is dead -- please leave it alone. Resist the temptation to continually check on the animal; doing so only serves to further separate it from the doe. If you have questions, call your local Fish and Game office before taking any action.

Moose calves should also be left alone and given plenty of space, for all the reasons explained above. What's more, cow moose may aggressively defend a calf and can prove dangerous.

Note that it is ILLEGAL to have in your possession or take any New Hampshire wildlife from the wild and keep it in captivity. Only qualified people with a special rehabilitator's permit, issued through Fish and Game headquarters, may possess any wild animal.

The New Hampshire Fish and Game Department is the guardian of the state's fish, wildlife and marine resources and their habitats. Visit http://www.wildlife.state.nh.us.

- ### -

--
Copyright 2006 New Hampshire Fish and Game Department, 11 Hazen Drive,
Concord, NH 03301

Monday, May 08, 2006

COMPANION PLANTING

Let's talk a little about Companion Planting. It's something gardeners have been doing for generations, maybe even eons, for ALL kinds of reasons.
The one we hear a lot about is companion planting that helps keep some insects at bay. Another is one that will add nutrients to the soil helping us fertilize organically. Other’s allow our plants height that they can creep and crawl their way UP! Other’s provide shade to the roots of plants that find the heat crushing. These reasons go on and on.
It is important for us as gardeners to understand what this is about and to include these ideas in EVERY garden we work on. Whether it’s a perennial bed, a rock garden or our vegetable garden. It is just plain GOOD stewardship of the land. Something we should take very seriously.
In this day and age, we need to TRY to cut down on chemicals we use in the garden. We also need to think “sustainability”. Don’t let’s buy any more “gizmos” than we actually need. It just becomes another thing to find it’s way into the town dump!
I’ve found a wonderful site that explains EVERYTHING about COMPANION PLANTING. It explains the why, how and what of more things than you can even conjure up in your brain. Visit it!

Saturday, May 06, 2006

ORGANIC

For such a little word, it carries LOTS of meaning for all of us!
I have seen so much about "organic" things lately, that I thought perhaps I should do a posting about it.
I went to a function called "Flavors of the Valley" up here this past week. It hosted mostly Organic Farmers in our Connecticut River Valley. I got to taste the most wonderful produce. I also managed to bring home a fair amount of information about signing up for a summers worth of wonderful Organic products. It’s a great idea.
One of the things I picked up was a booklet written by Dr. Alan Greene, that wonderful Pediatrician. He mentioned all the nasty things that could be caused by chemicals put on our produce on farms and in our gardens. It ends up in the food chain and eventually in our bodies. Our children are particularly vulnerable to these additives that show up in the form of diseases and weaknesses in later life, if not right away.
His suggestion was to buy organic produce if economically possible, rather than get produce we all KNOW is treated chemically.
The bottom line here is that in our own gardens we should grow organic products! Leave out the chemicals if at all possible. Instead of spraying, pick off the critters and plunk them in soapy water if you don’t want to squish them.
Use mulch instead of chemical fertilizers. It’s better for your soil and plants than fertilizers are anyway. It’s also cheaper, I might add!
Try interspersing your garden with plants that bugs find offensive.
Have you heard of IPM (Integrated Pest Management)? If you haven’t, get studying!
If you MUST spray, don’t do it on a windy day when it can spread to places it’s not welcome. Also, do not spray insecticide when our pollinators are out and about. Do it at, or after sunset, so you know the good guys are home asleep! Many malicious bugs do their dirty work after nightfall. Take advantage of that!
Here's a site from Washington State on the other side of the USA, but it's a good place to find out the meaning of the term Organic Gardening.

Thursday, May 04, 2006

ROSES

I've seen a lot of plastic bags with rose plants in them sitting in yards as I've driven by. It's the season to get outside and plant. Many of you have succumbed to the call of the perfect rose. We all love them and want so very much to grow them and enjoy them in our homes. They are both beautiful and fragrant, so let’s see what we can do to help them be the very best they can be in our gardens.
Roses are considered difficult to grow and care for. That can be true, but once you know what they need, you’ll be considered by your friends to be a “rosarian” or one who knows their way around roses!
First though let’s get those roses out of the bags and into the ground!
Chances are the rose you brought home has been sitting on a shelf or in a truck for MUCH too long! It’s probably dry and undernourished. It’s crying for help!

The day before you’re ready to plant it, remove it from the bag and soak it for up to 24 hours. Before you put the rose into that bucket however, add some household bleach to the water. Add about 1/8th of a cup to 5 gallons of water. This will take care of any bacteria that are lurking in and around the roots. Many rosarians advocate adding a little liquid fertilizer to the water as well.
When they’ve had a proper soak, cut out (with a SHARP and CLEAN pruner) those roots and stems that are diseased, broken or dead! Go a bit beyond (about a quarter of an inch into the good wood) the dead or broken spot. You are now ready to plant.

Rather than try to explain all that here, go to this web site on Rose Care and follow the directions. It is from the North Dakota Extension Service…but that’s OK. It’s a good demonstration for you.
Next spring, when you get to the point you need to prune those roses, try this web site for some good advice!

Monday, May 01, 2006

FOLIAGE ON BULBS

I’ve had a number of questions about what to do with the leaves once the daffodils and other bulbs have bloomed. Should they be cut back? Should they be left on forever? Let’s think about that.
Bulbs are under the ground where they have no nutritional support except their roots and leaves. The roots can get a lot of nutrients, but get NO benefit from the sun, or chlorophyll, etc. SOOOO….
NEVER cut back the foliage on your bulbs! This is one of the reasons it is often suggested that you plant bulbs in amongst your perennials, or pachysandra, or other ground covers. That way when the bulbs are done blooming, the other plants send up foliage that covers up the dying leaves left over from your daffodils, tulips, hyacinths, etc.
Anyway, once the leaves have turned brown it’s safe to remove them by cutting. I wouldn’t pull them because you might damage the bulb. At this time, I would suggest you might think about scratching in a little Bulb Booster or other bulb fertilizer. It will make a heap of difference.
If you'd like to learn a little more about bulbs and their care try visiting this site posted by the University of Illinois.
How is YOUR garden coming? All I have up are a few daffodils and pearl hyacinths. I’m being patient!
Don’t be like the lady I just heard of up here in zone ¾ who planted her tomato plants in the open ground. They will be gone soon! It’s too cold. They weren’t kidding when they said the North Country Planting Season is from Memorial Day until Labor Day! Woe is me!